
This post may contain affiliate links. If you use the links I make a small profit at no additional cost to you.
I love making paper flowers and have gotten lots of feedback on the ones I have posted on Instagram. I think there is a common misconception that you have to have really complex (and expensive) templates to make beautiful paper flowers. That is so far from the truth! So, today, I’m going to show you how to make some stunning flowers, with my easy (and totally FREE) template!
I’ve got two paper flowers for you today: layered and semi-rolled. These templates are SVGs and are perfect for cutting with a Cricut or Silhouette. They can also be cut by hand though! Simply open the file and print. Here are the files:
Layered Flower SVG
Semi-Rolled Flower SVG
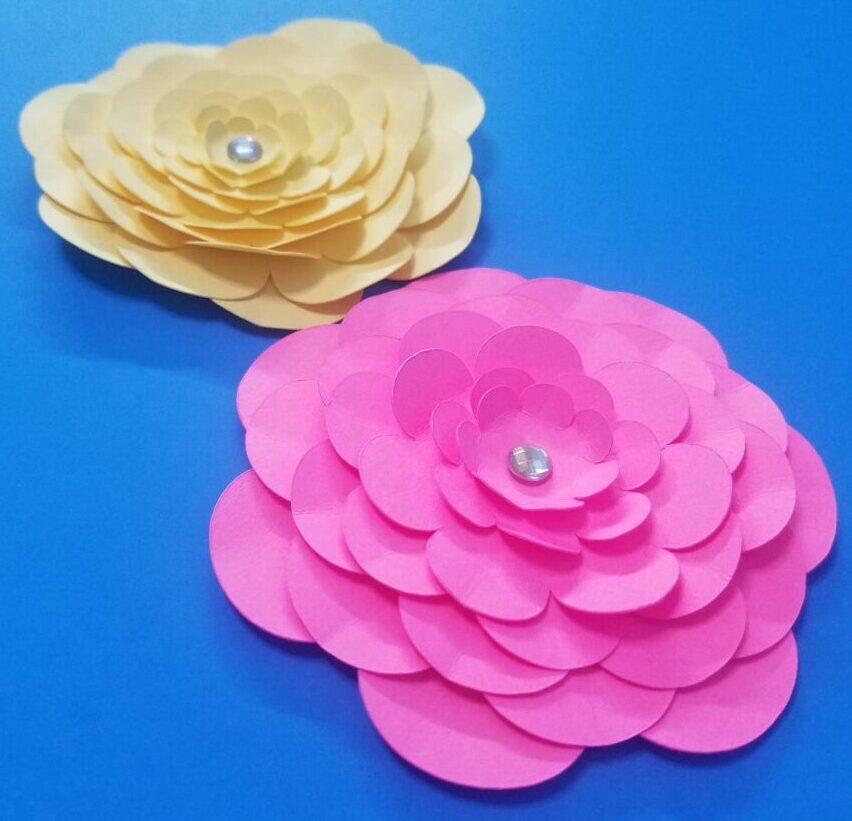
Layered paper flowers are a great flower for beginners! Cut your flowers out on a 60-80 lb cardstock (I usually use Recollections from Michael’s). Before you assemble your flower, do a little folding of each flower petal. You can do a hard crease down the middle or just a soft curling of the whole petal; it is up to you. To assemble: start with the largest flower and then hot glue the second largest on top. Continue with each smaller piece until all of the flowers are in place. Then, fluff your petals to create a more 3D look. To finish, add a bead, gem, or piece of paper in the center. The video below will show you the process sped up. If you want more tips and tricks click here to watch my full YouTube video.
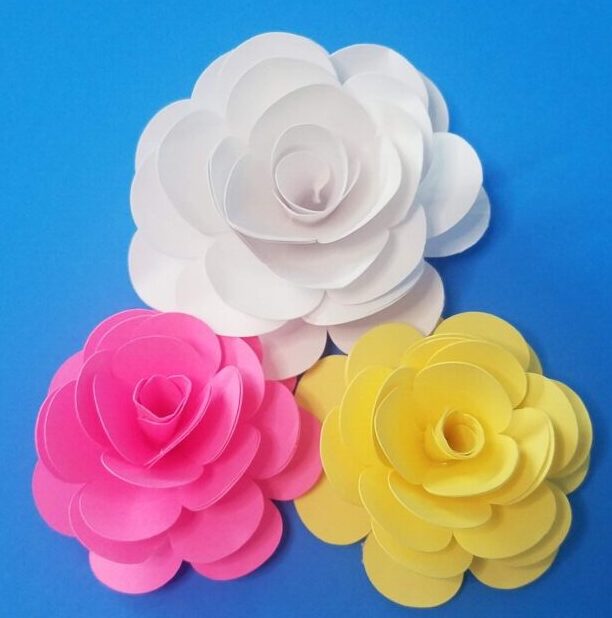
Semi-rolled paper flowers are probably my favorite type. They are so simple but turn out beautiful! In fact, if you look at my head shot you just might spy a beautiful hot pink one! I highly recommend watching my full YouTube tutorial for this one, but I will try to explain it in writing as well for those who learn better that way. Cut the flower on a 60-80 lb cardstock (I like Recollections from Michael’s). Take the flower that is nearly full, but has a slit down one side. Place the petal on the right side of the slit underneath the petal on the left, creating a cone-like shape. Hot glue in place. Continue in a like manner for all of the partial flower pieces. When you get to the smallest (3 petal) piece, roll it up into a little tube. place a little hot glue near the middle of the outside petal and glue into place. Now you are going to glue the cones inside of each other. I recommend going smallest to largest. Hold your glue gun slightly above the cone to avoid getting glue on the sides. You will notice your rolled center is slightly taller than the rest. I like to trim the bottom off so it fits inside the flower, but you could leave it taller if you like the look. Now that you have all of your cones together, it’s finally time to grab the last flower piece (the one without a slit). This is your base. Using a lot of glue (seriously, a lot) put a (big) dollop in the center of the base piece and place your flower on top. Hold the flower in place until glue is completely set. Again, this is all explained better in my YouTube video! If you don’t have the time for that, feel free to watch me make one (in super speed) below.
Here are the files one more time. If you use the template, please tag me on social media (@craftinkiy) so I can see it! I love seeing your creations! Also note, you are welcome to sell the flowers made with these templates, but please don’t sell/send the templates to others, just send them a link to this page! Thank you all! Happy crafting!
I’m going to make some flowers with my 8-year old granddaughter this week. Thank you!!
That sounds like fun! I’m excited to see how they turn out. You’re welcome!
Love these!! They’re so full for paper flowers!!
Thank you! ❤
Thank you for the instructions, I have been wanting to learn
You are welcome! Can’t wait to see your flowers!
Nice! I’ll have to add these to my list of projects to make for my daughter’s room.
I’m sure she will love them!
Omg finally found what I was looking for!! And so much easier than I thought it was gonna be. Heading to my craft room now!! Thank you!!
Yay!
Thank you! I have to figure out how to tag you but the semi rolled flowers are great and easy to make last minute.
I’m glad they turned out well! Thank you for the feedback!