
My two-year-old is obsessed with puzzles! He is also really, really good at them. I mean, he’s two but he can put a 30 pieces jigsaw puzzle together by himself. It’s crazy! He already has most of the puzzles from Dollar Tree, so I decided to make one special just for him! If you have a Cricut Maker you can make one too!
What Supplies do I Need?
- Cricut Maker
- Cricut Knife Blade
- Sticker Paper – Neato Printable White Vinyl Labels (affiliate link)
- Chipboard (continue reading to see what I use)
- Cutting mat (Heavy is recommended, but I always use a standard one that I’m about to throw away anyway.)
- Masking tape
- Inkjet or laser printer
- Brayer
Do I have to have a Cricut Maker?
For this project, I used the Cricut Maker with Cricut Knife Blade. You could try using a deep point blade on your Cricut Explore but it does not have the same power as a Maker, so you may want to use a thinner chipboard to avoid damage to the machine.
What Sticker Paper Should I use?
I used Neato Super Glossy Waterproof – Full Sheet Vinyl Labels White. This vinyl works well because it is so thick and durable. It also can be printed with either an inkjet or laser printer which is nice. These stickers can be an investment, but they work great for a lot of projects and they are cheaper if you buy through Neato.
What is Chipboard?
Alright, I could be technical, but let’s just be honest, chipboard is fancy cardboard. It’s not the regular cardboard with the bumps on the inside, it’s the flat stuff (think cereal box). Ya know, the stuff puzzles are made out of!
Do not go buy fancy chipboard! You probably already have some laying around your house. You could use a cereal box if you wanted, but I personally find it too thin. The best place to look is in your stack of scrapbook paper. You know that little piece of garbage that comes with your paper to keep it from bending in the store? That’s what you want! If you have a pad of paper, it’s the hard backing, if you have a pack of paper, it might come with a piece too!
How do I Design the Puzzle?
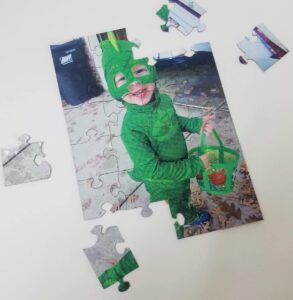
First, make sure to download my free puzzle templates below! Then, you will want to select an image to appear on your puzzle. I chose a picture of my little guy in his Halloween outfit. Upload both of these images to Cricut Design Space. Once that is done, pick which puzzle template you will be using and hide all of the others.

Next, you need to ensure your puzzle and picture are the same size. You may need to crop your picture to get it the right size. To do this, create a rectangle that is the same size as your puzzle (watch my video for a quick way to do that). Then place the rectangle over the part of the picture you want to keep. Select both the rectangle and image and click slice.
Once your puzzle and image are the same size, place them on top of each other (it doesn’t matter what order) and attach. Then you are ready to print! Make sure your image is no greater than 6.75×9.25 inches. (The green puzzle image should be the perfect ratio!)
How do I Print my Puzzle Image?
If you are using the Neato sticker labels you can print on either an inkjet or laser printer. Before printing, do a test print to make sure you image will appear on the correct side of the sticker paper. When you go to print, make sure you change it to the glossy paper setting.
How do I Prepare my Mat and Materials?
The first thing you need to do is stick your sticker to the chipboard. Pull the entire sheet (images and Print then Cut sensor marks) off of it’s backing and line it up in the top left corner of your chipboard. Use a brayer to ensure there are no air bubbles.
Next, lay your chipboard on the mat. Make sure it is no more than 11 inches wide. Your star wheels (little white rings on the pole inside your Cricut) are going to be on the right side of your mat and you need to make sure they won’t run into the chipboard. So, if your chipboard is wider than 11 inches trim it with an X-acto knife.
Once your chipboard is ready to go, tape it to your mat with masking tape on all four sides.
What Setting do I use to Cut my Puzzle?
I wish this was a simple answer. All chipboard is a little different, so there will be some guess work involved. I was using a very thick chipboard. I tried it on both the Kraft board setting and the Heavy Chipboard setting. Both were done after about 10 passes.
Now, I can’t lie. This is a LONG cut. Most likely, it will take at least one hour. Check on it periodically to see if it’s doing ok and to make sure it hasn’t finished early.

I think that covers it! If you have any other questions please comment below. Thanks for stopping by and happy craftin’!
That is so freaking cool!!!!
Thank you!
Thanks for the great instructions and video! I’m new to cricket maker and I’ve made several card projects so far. I bought the cricket chipboard to make a puzzle and followed all the instructions. I used the cricket sticker paper instead of neato. Unfortunately as the puzzle started cutting right within pass one, the paper started peeling off of the board so the puzzle was ruined. I tried another run with a new sheet of chip board and the same sheet of vinyl but this time I used gorilla spray glue on the back of the vinyl and compressed it overnight to be sure it was going to stick. Exactly the same thing happened. When I go to cut my project out I’m not given the option of changing the blade pressure. That option is grayed out. I’m thinking that might be the issue but I’m hoping you might be able to get some advice. Many thanks.
I’m so sorry for the slow response! I hope you’ve been able to fix it. Are you using the knife blade or a deep point blade for your Cricut maker? I would reccomend the knife blade for this project. I’m not sure why the pressure change button would be grayed out, but you could always make a custom design setting for it or try a different setting. If you need to know how to make a custom setting I have a video in this blog post. https://kiyscraftroom.com/blog/cricut/how-to-cut-dollar-tree-glitter-vinyl-paper/